Help & Setup
Welcome! Bookeo MCP is a little bridge that lets your AI assistant (like Claude or ChatGPT) talk to your Bookeo booking account — so you can ask it things like "what's on my calendar this week?" or "book Jane for Saturday at 2pm" in plain English.
This guide walks you through it, start to finish. No tech background needed.
1. Create your account
- Go to bookeo.iotashan.com.
- Click Sign in, then create your account (email + password, or a magic email link — your choice).
- That's it — you're in.
2. Subscribe
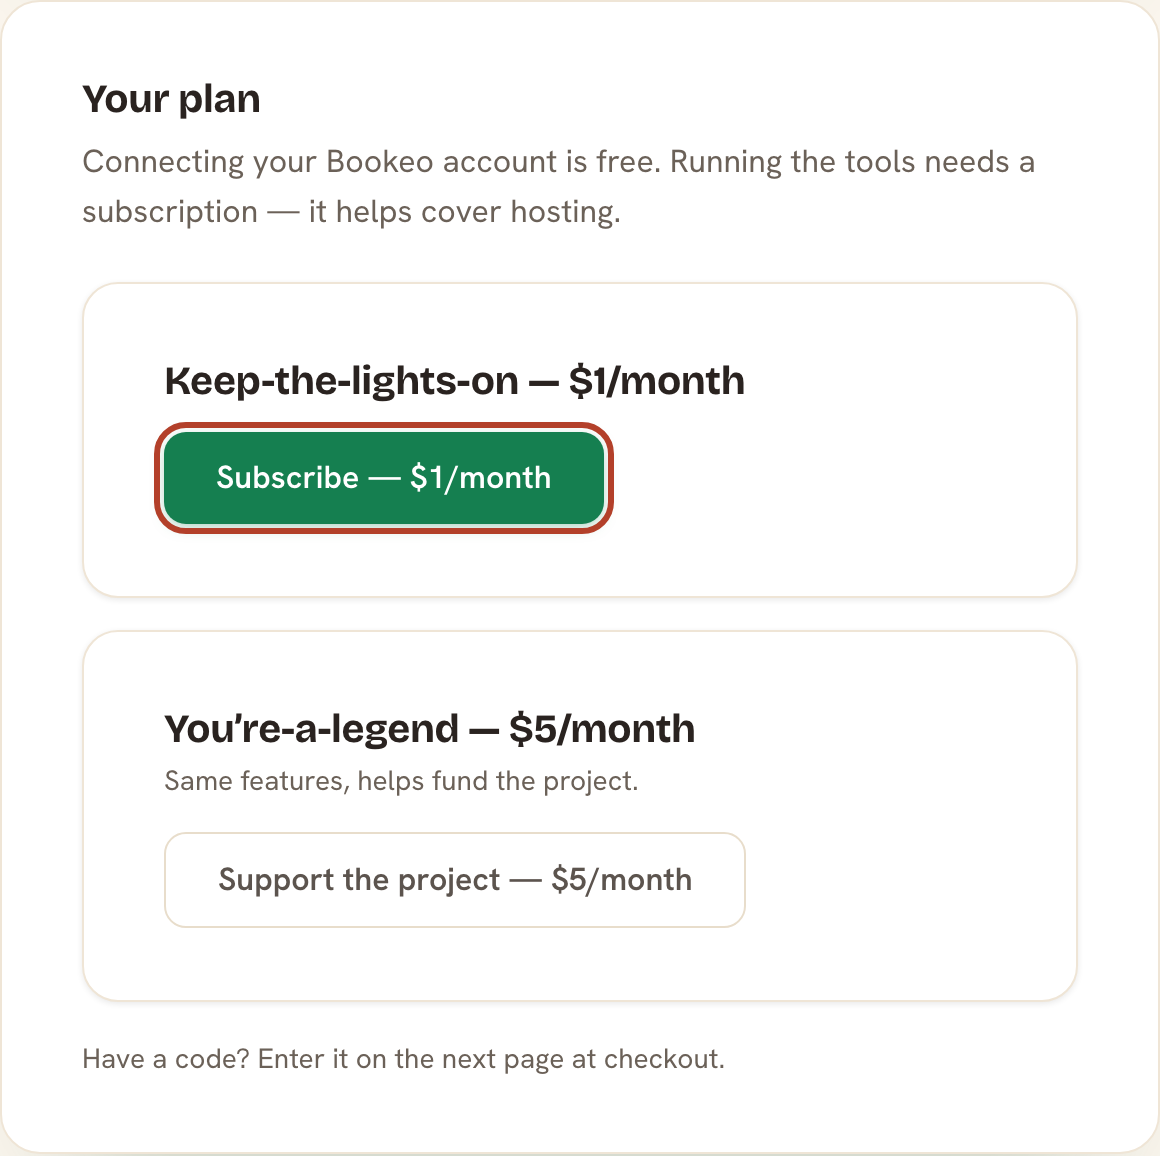
Bookeo MCP is a small paid service (it helps cover hosting). Set this up first — then connect Bookeo and point your AI at it.
- Go to bookeo.iotashan.com/billing.
- Pick $1/month — or $5/month if you'd like to support the project (same features either way; the extra just helps keep the lights on and fund more tools like this 💛).
Want to chip in a little extra? There's an optional one-time "buy me a coffee" tip on the billing page — but it's just a thank-you and does not replace the subscription you need to use the tools.
3. Connect your Bookeo account
- Go to bookeo.iotashan.com/connect.
- Choose what you'll let your assistant do — for each area (Bookings, Customers, Availability, Payments) pick read-only, read & write, or full access. Each option explains in plain words what it can and can't do. You can always reconnect later to change this.
- Click Continue to Bookeo and approve. Done — your accounts are linked.
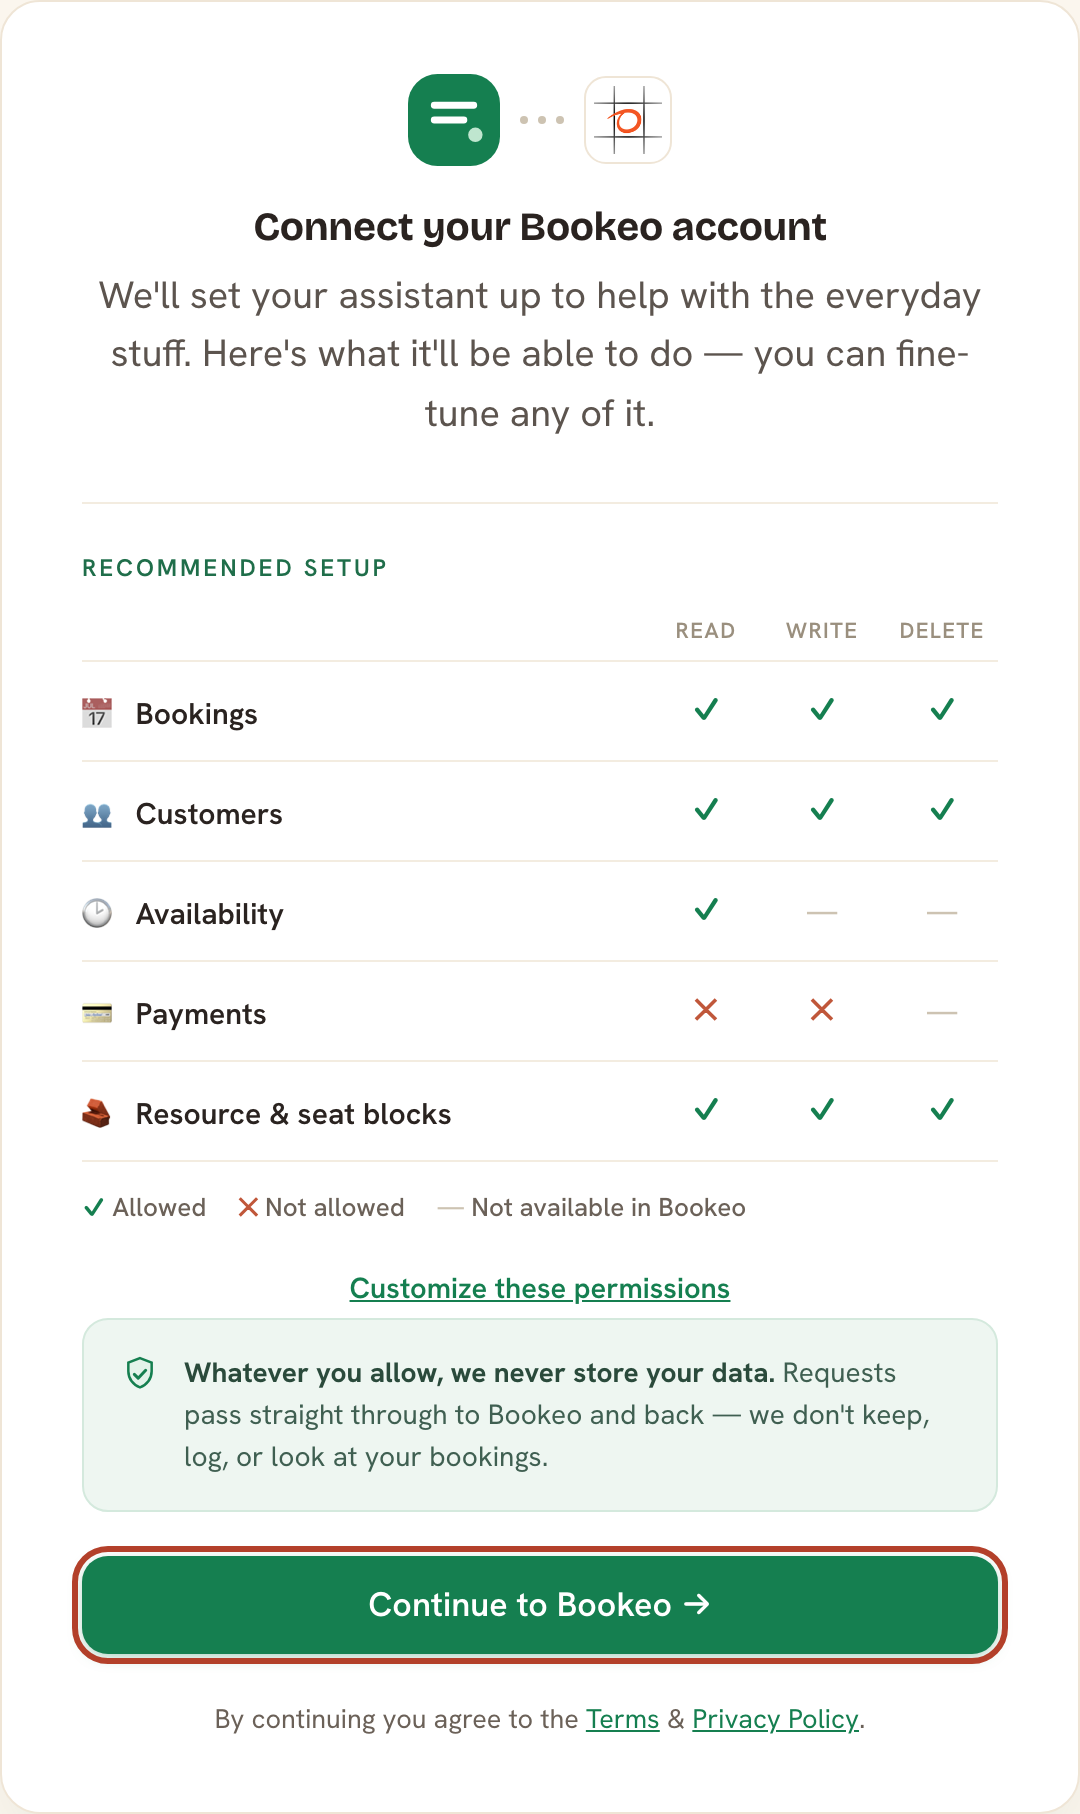
Tip: Start with less access than you think you need. You can grant more anytime. We pre-select sensible defaults and leave Payments off unless you turn it on.
Seeing "You have already installed this application"? Bookeo allows only one Bookeo MCP connection per Bookeo login at a time. If you and a teammate share the same Bookeo login, the second person to connect will hit this error. Either have everyone use the same Bookeo MCP account, or give each person their own Bookeo login (Bookeo's user/sub-account feature) and connect each one separately. To move the connection to a different MCP account, first disconnect the existing one (see "How can I make sure Bookeo MCP no longer has access to my Bookeo account?" below), then connect again.
4. Add Bookeo to your AI app
You only need to do this once per app. When prompted, sign in with the same account you made in Step 1 to link them up.
Once you're connected you'll see a confirmation with your connection address to copy:
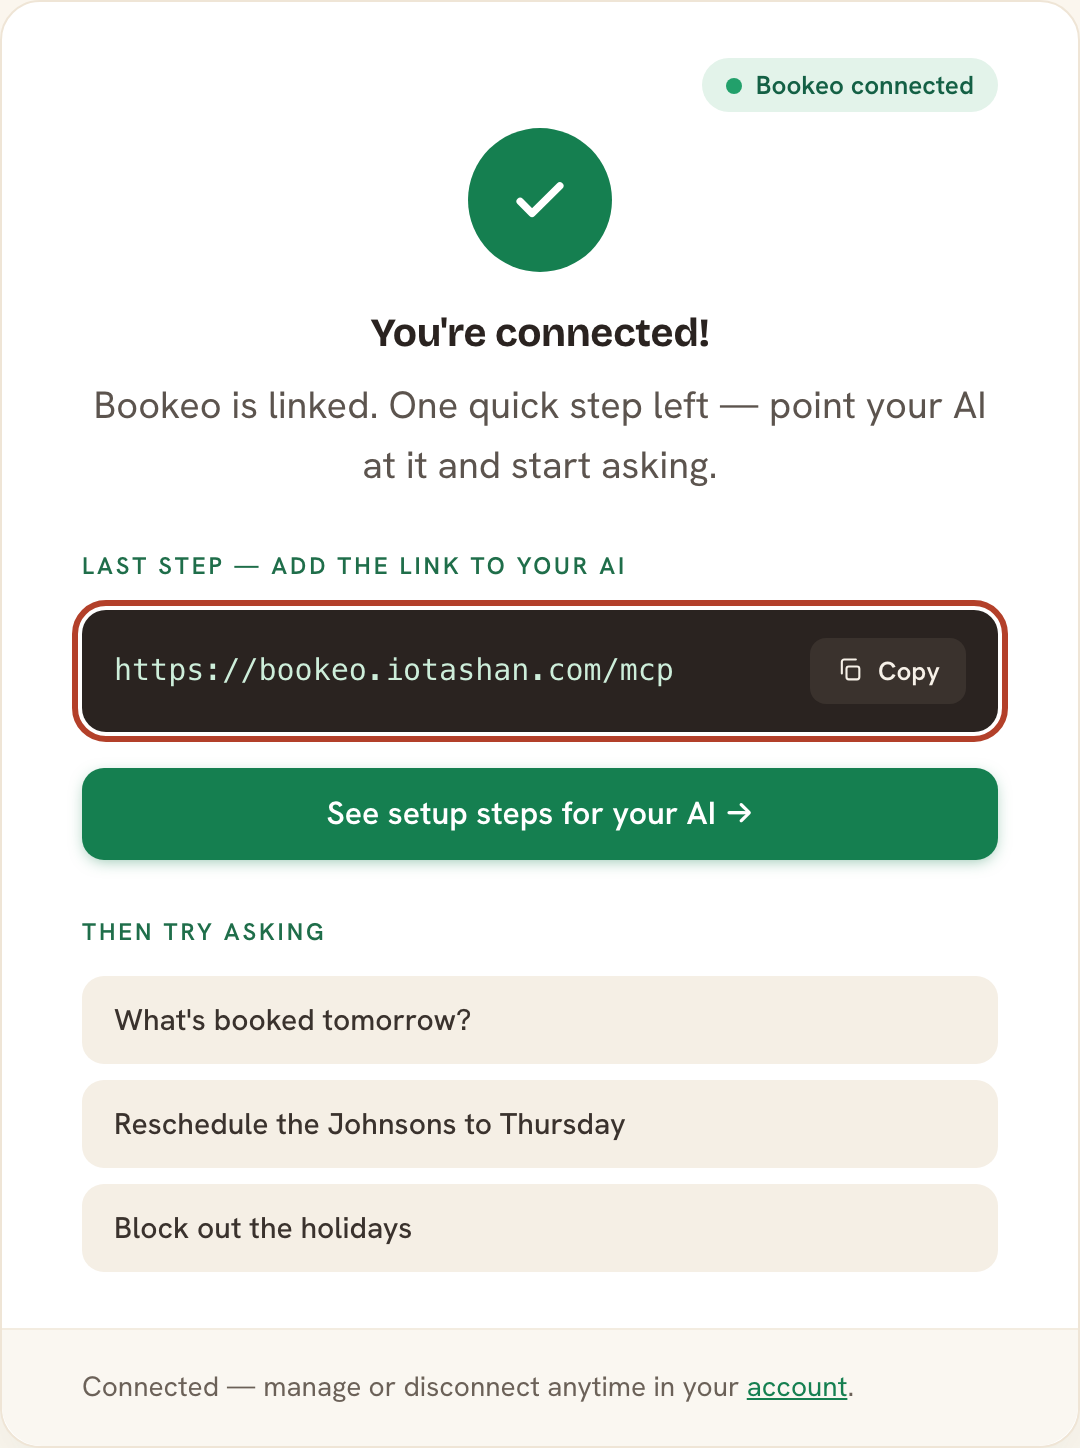
Your connection address (you'll paste this in):
https://bookeo.iotashan.com/mcp
Which app? As of mid-2026, Claude is the smoothest for most people. ChatGPT supports custom connectors through Developer Mode, mainly on Business/Enterprise workspaces. Gemini's everyday app doesn't support custom connectors yet, and Copilot is set up through Copilot Studio (a business tool) — details for each below.
Claude (web, desktop, or mobile) — easiest
- In Claude — on claude.ai, the Claude Desktop app, or mobile — open Settings → Connectors (on claude.ai this currently lives under Customize → Connectors).
- Click Add custom connector.
- Give it a name (e.g. Bookeo) and paste the address above.
- Click Add, then Connect — a sign-in window pops up. Sign in and approve.
- Look for Bookeo in the connectors/tools list in your chat. You're ready — try "List my Bookeo products."
Custom connectors work on Claude Free (one connector), Pro, and Max. On Team/Enterprise an owner may need to add Bookeo for the whole organization. Web and desktop are the main path (mobile is newer); it's still in beta, so wording may shift a little.
Prefer step-by-step pictures? See Anthropic's official guide: Get started with custom connectors using remote MCP.
ChatGPT
ChatGPT can use custom MCP connectors through Developer Mode — today mainly on ChatGPT Business / Enterprise / Edu workspaces (on the web), where a workspace admin/owner turns it on. On a personal Plus/Pro plan, check whether it's available to you first:
- In a workspace where it's available, open Settings → Apps & Connectors → Advanced settings and turn on Developer mode (on Business/Enterprise an admin/owner enables it for the workspace).
- Back in Apps & Connectors, choose Create to add a custom app / MCP server, enter a name, and paste the address above. Save.
- Sign in when prompted and approve.
- Start a chat and ask it to use Bookeo.
Menus move around as ChatGPT updates. The things to look for are Apps & Connectors, Developer mode, or MCP server — then paste the address above and sign in.
Prefer pictures? See OpenAI's Connectors in ChatGPT and Developer mode & full MCP connectors.
Gemini
Heads up: today the everyday Gemini app (gemini.google.com) doesn't let personal accounts add a custom MCP server, so Bookeo MCP isn't available there yet. Custom MCP currently lives only on Google's enterprise/developer surfaces — most notably Gemini Enterprise, a Preview feature an admin sets up in the Google Cloud console (with its own OAuth configuration — not just pasting a URL). For everyday users we'd suggest Claude or ChatGPT for now. (We'll update this the moment the regular Gemini app supports custom connectors.)
Reference: Set up a custom MCP server in Gemini Enterprise.
Microsoft Copilot
Copilot uses MCP through Copilot Studio (the agent builder), rather than the consumer Copilot chat directly:
- In Copilot Studio, open your agent's Tools page and select Add a tool → New tool → Model Context Protocol.
- Enter a name, a short description, and the server URL (the address above), and pick the authentication type when asked.
- Publish the tool, then call Bookeo from your agent.
Setup lives in Copilot Studio (not the consumer Copilot chat) — your published agent is what talks to Bookeo. (Adding an existing MCP server in Copilot Studio is generally available; some newer agent-workflow MCP features are still rolling out.)
Microsoft's guide: Connect your agent to an existing MCP server.
Claude Code (for developers)
In your terminal:
claude mcp add --transport http bookeo https://bookeo.iotashan.com/mcp --scope user
Then run /mcp and complete the sign-in when it opens your browser.
Codex (for developers)
Add an MCP server entry pointing at https://bookeo.iotashan.com/mcp (HTTP transport) in your Codex MCP configuration, then authenticate when prompted. A recent Codex version with remote-MCP support is required.
Connecting more than one Bookeo account
Each Bookeo MCP account links to one Bookeo account. If you run several Bookeo accounts — say two locations or two businesses — and want your assistant to reach all of them, set up a separate Bookeo MCP account for each, then add each as its own connector:
- One Bookeo MCP account per Bookeo account. For each Bookeo account, sign up with its own email, subscribe, and connect it to that Bookeo account. (Each is its own small subscription.)
- Add the connector once per account. Use the same address every time —
https://bookeo.iotashan.com/mcp— but give each connector a clear name so you can tell them apart, e.g. Bookeo – Downtown and Bookeo – Uptown. - Sign into the matching account. When each connector asks you to sign in, use the Bookeo MCP account for that Bookeo account. If the sign-in window reuses a previous login, choose Log out (or "use a different account") so each connector ends up tied to the right one.
Now your assistant sees each Bookeo account as its own set of tools — just name the one you mean, e.g. "in Downtown, what's on Saturday?"
Reusing the same address is expected — connectors are told apart by the account you sign into, not the address. If two connectors sign into the same Bookeo MCP account, they'll both point at the same Bookeo account (and you'll hit "already installed" if you try to link a second Bookeo login to it — see above).
Cancelling your subscription
You can simply ask your assistant — e.g. "cancel my Bookeo MCP subscription" — and it'll walk you through it. Or do it yourself:
- Go to bookeo.iotashan.com/billing.
- Click Manage subscription — this opens our payment provider's secure portal where you can cancel (or change your plan or card).
- You'll keep access until the end of the period you've already paid for.
Want to also cut off Bookeo access entirely? See the next section.
How can I make sure Bookeo MCP no longer has access to my Bookeo account?
You can ask your assistant — e.g. "revoke this app's access to my Bookeo account" — and it'll disconnect on our side and tell you how to finish in Bookeo. You can also disconnect yourself anytime from your account page (the Disconnect link by your Bookeo connection). The surest, complete way is to remove our app from your own Bookeo account — that instantly revokes the key Bookeo gave us, so we can't reach your account no matter what:
- Sign in to Bookeo as the account owner (only the owner can do this).
- Open the account menu and go to the Applications page — this lists every app/integration you've authorized.
- Find Bookeo MCP in the list and click Uninstall (remove/delete).
- Done. The instant you uninstall, the key Bookeo issued to us stops working — our access to your account is completely cut off.
Bookeo has a step-by-step guide here: How to delete and uninstall apps from a Bookeo account. If you can't find it or get stuck, contact Bookeo support at support@bookeo.com (or via bookeo.com/contact) — it's their screen, so they can point you right to it.
If you change your mind later, just reconnect from our Connect page and Bookeo will issue a brand-new key (the old one stays dead forever).
On our side, that leftover key is now useless, but if you'd like us to delete it from our records too, send a note via our contact form and we'll wipe it.
Your data — the short, honest version
We're only the bridge. We don't want your data, we don't look at it, we don't store it, and we never sell it. When your assistant asks for something, we pass the request to Bookeo and hand the answer straight back — your bookings and customer info just pass through; we don't keep a copy.
The only things we hold onto are the bits we need to make the connection work (an encrypted key for your Bookeo account and which org you belong to), plus boring technical stuff like error reports and usage counts so we can fix bugs and make things better. That's it.
The full details are in our Terms of Service and Privacy Policy — worth a skim.
Need a hand?
Use our contact form and we'll help you out.